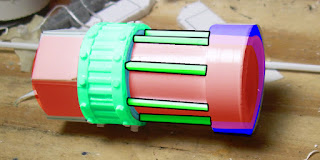
Okay so I'm not sure what I'm calling this project anymore. I'm still intending to build a Thunderhawk, but the case-study of building a Thunderbolt has really taken on it's own life and become a project onto itself. Regardless I am making progress. One of the key points I was planning on under taking in building the Thunderbolt was scratching one engine and then casting two copies of it for the finished model. Well, I've finished building the original master:
The engine itself is build with a long central tube, and several larger segments of tubing glued to the body. I'll explain in more detail below.
The red is a single long tube measuring 5 centimeters. if you look at the front you'll see 2 colored rings, one purple and one blue. Those are each another ring of piping affixed to the tube. The green ring further back is another segment of tube the same thickness as the purple tube at the front, but this one has a layer of roof textured glued to it. Then the green and black segments in the front are lengths of hex rod glued in place.
The way the template has the engines, they are built in 2 parts and then each affixed to a box on the side of the main body. Here you see the scratch built air-intake and the main engine housing.
I have some details to add to the master before it's ready to cast but it's all repetitive details, items that appear in multiple places on the finished model. So what I'm going to do is quick-cast a mold of the master of the detail part, then with the finished mold use green stuff to cast copies of it that can then be affixed to the engine master. With a little luck, I'll be posting on that in the next few days.
Wednesday, January 02, 2013
New update on Project Thunderhawk... er bolt... thunderhawk bolt
Posted on 9:42 PM by Michael
Subscribe to:
Post Comments (Atom)


0 comments:
Post a Comment