So There's not much I can do with the Thunderbolt right now. Not until I get the new supply of Mold Compound which isn't going to happen for a little bit. Need to recover from the medical expenses. But one thing I don't do very well is nothing. I can't not be working on a project of some form. It just doesn't happen for me. It may not always be War hammer related but I am working on something.
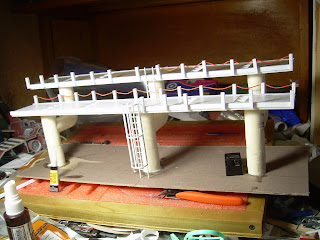
So today I decided to take a cue from a friend and fellow blogger, Virtual Stranger. He runs "In the Grim Cheapness of the Future" and has served as something of an inspiration for my own scratch building adventures a couple of times. So what direction did I take form him? The cheap ass one! I decided to see what I could with what I have on hand. Now with a bitz box the size of the one I have I could probably pull together enough parts to build something on the scale of a land raider if I really wanted to, but I have enough models for the time being. I don't need to build more random ones. So I decided to shift gears a bit and try something in the terrain category. I got a series of videos from MiniWargaming.com a while back. I don't recommend their videos as basis for learning new techniques, as they are rather caviler with their explanations and directions about what they are doing and there have been a lot of times they've just blown through a major chuck of the project and I'm left scratching my head trying to understand what the hell they just did. Like wise they're words regarding safety is painfully lacky and frequently limited to "Just be careful you don't cut your self." There are a lot of times in the videos where I feel the need to reach into the video and hold up a sign that reads "Do NOT do this the way I am doing it. It is not safe.!" Their videos are definitely geared more toward the veteran hobbyist then the young blood. But they do have some ideas that are worth wild. One video they did is constructing an industrial catwalk using 1/2 pvc plumbing pieces as the basis for it.
The project is rather straight forward and uses a handful of materials. Most of which I had one hand. I made 3 alterations to their project in my rendition of it.
Firstly, I filled the PVC tubes with resin and then attached the catwalks to the piped by counter sinking a screw into the resin in the pips and then pouring resin into the squares under the catwalk platform. This helped secure the entire structure.
Second, I attached long segments of angel bracket to the sides of the catwalk, covering the edges of the diamond plate and giving it a more "This is intended to be walked on by normal people" look to it.
The third thing I changed was a partially a matter of convenience partially one of preference. I used an enclosed ladder cage on the lower segment of the walk for the ladder. I grew up around military bases and one thing I always saw a lot of were "Off limit" warnings and safety mechanisms. In the real world these cages are put on ladders to prevent people from falling back and off of the ladder. Yes it's still possible to fall down and have the cage make no difference what so ever. But then you get into the realm of "How did you live long to get hired for this job?"
I thought this would add a little bit of realism to the piece. Plus I had the material on hand and didn't have to get it.
With the exception of the Light diffuser, base board, and plumbing parts, all of which can be obtained from a hard ware store for about $25, all the materials in this project can be obtained through Plastruct and EverGreen plastics.
Monday, January 21, 2013
Well some busy work
Posted on 2:12 PM by Michael
Subscribe to:
Post Comments (Atom)


Wow!I really am impressed with this piece. I love nice looking terrain and this is one!
ReplyDeleteHow long did it take to make? How 'top heavy' is it? Will it want to tip backwards if loaded with minis?
I must say I enjoy reading your posts, your writing style is refreshing. Thank you for sharing and keep up the good work!