Monday, May 27, 2013

Projects and updates

So I found myself the recipient of what is probably the single best time off arrangement I can: 2 days off, 1 day of work followed by 2 more days off. Why is this such a good arrangement? Simple. I get 2 days to myself, to work on my stuff, and then just as I'm getting a little bored of my own projects.... boom I have a day of work that acts as a re-set on my own personal projects and then I have 2 more days to work on my stuff. So what have I been working on? Well several things.

Yeah I stuck a bunch of wires in a bread board.

Dragon Forge's Heroic Urban Rubble base with wires in it to power an LED
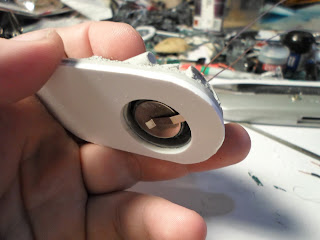
No I've done more then just that.  I'm working on a new captain on bike for my Blood Ravens but I'm feeling ambitious so I'm going to wire it up so the head lamp in the bike will light up. Which means it needs power. So using the Heroic Urban rubble bike base, available from Dragon Forge Studios, I took a dremal to the bottom of it to carve out a space for a button battery.
a Dragon Forg Base with a space drilled out to accomidate a button battery
I messed up the messurements and didn't make the opening deep enough to account for the battery clip and the battery itself. So I added a 2mm thick sheet of styreen to the bottom of the base to account for it. All in all I think it helps because I'll draw more attention to the captain who should look more heroic and stand out. 
Space marine Dark Angel bike ferring with the head lamp drilled out to accomidate a 3mm LED
I drilled out the head plate for the ferring and was going to mount the LED in it but then discovered the white LEDs I have are 5mm and 10m, not the 3mm side I need for the mounting. So I'll have to pick up some 3mm LEDs to continue working on this.
space marine bike body with the holes to accomidate the electronics
Since the bike is going to be attached to the base, and have wires running through it, I specifically went in and glued the wheel halves to the body and then carved out too spaces in the back. one you can see at the front of the rear tire. This is for the wires to come back through the body and connect to the switch in the back of the body. The second space you can just barely see at the top of the rear wheel. That's going to be where the switch will be installed.
Blood Raven Land speeders partially painted and assembled.
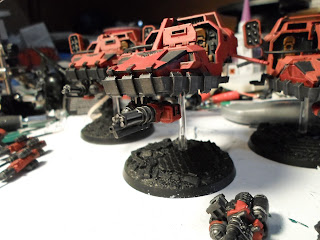
 Something else I've been working on: My Blood Raven's land speeder detachment! Here you can see the 3 of them:
Blood Raven Land speeder equipped with an assault canon
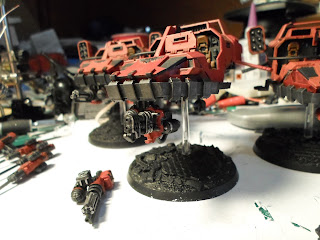
 I installed magnets in the noses and in the turret bases of the weapons so they can be swapped in an out.
Blood Raven Land speeder equipped with a heavy flammer
 Allowing me to field them with heavy flamers or assault cannons. I need to build the under slung heavy bolters and magnetize those as well.
pressure pot
Oh and here's some good news: My pressure pot is set up and working! So now I can start working with pressure casting and hopefully begin producing better pieces for my projects. Or I will be once I get the resin and silicons that will work with pressure casting.

Thursday, May 09, 2013

Resin casting update

So I'm putting together a pressure pot for resin casting. The idea is you use air pressure to 'crush' bubbles out of resin and silicon to make more details molds and casts. As I had previously mentioned, resin is a thick material even when it is in it's liquid form it's still quit thick and thus the resin itself can support some weight. When it comes to casting parts, this gives rise to the 'bubble trouble', ie bubbles in the resin ruining the details in the cast part. So by crushing the bubbles out of the resin, and the mold rubber when making a mold, I can in theory correct that problem.

So I did my research, found a good pressure chamber that rated for about 90 PSI, for about $125. Had to buy a coupler for for about $3. Bought a compressor for $190. Needed to add a sealed cap to the chamber. That cost about $2. a $5 roll of Teflon tape to seal up the connections and it looked like I was ready to go. I hooked up the compressor, sealed the chamber and made a test run. I watch the regulator gauge slowly rise. 5 PSI. 7 PSI. 9 PSI. 11 PSI... Suddenly the safety valve pops. I look at the valve and think it might have been caught on the compressor hose. So I empty the chamber, open it, reapply some petro-jelly, seal the chamber, and start the compressor. 2psi. 4psi. 6 psi. 8 psi. 10 psi. 12psi... POP goes the safty valve. Yep, the saftey valve is bad. on a bot that is designed and intended to withstand up to 90 pounds of pressure per square inch... the valve pops at about 12 psi. 

Well balls.

Tuesday, May 07, 2013

Helbrute update

Okay, so I'm a dumb ass. I did all that work on the helbrute, building the LED circuit, installing the LEDs in the fists, boring out a comparment in a base for the battery, all the work to build up the base... and I totally neglected the fact that the circuit was going to need about 8 volts of power and the dime battery only supplies 3 volts... So... end result: The 4 LED circuit I had been intending to build has been cut back to a single LED in the left power fist.

I'm also going to modify the post of the model to have the left power fist drawn back and the right one cutting across the chest like the Brute's about to swing back against an attacker with it's burning left.
 
the LED circuit in the HelBrute
But here you can see the finished base and the circuit. I used green stuff to seal off the switch and the junctions in the body. This helps do a couple things.
First it cements the switch in place so that there is no wiggle room.
Second it holds the connects in place so there's no chance of them coming loose later on.

the base of the HelBrute showing the battery
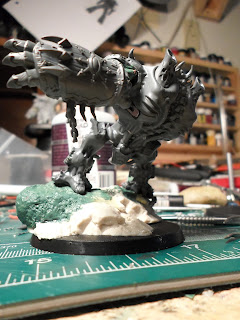
I've spent a lot of time and effort on the base of this model so I'd like to talk about it. Here you can see the dime battery and holder in the base of it. In order to accommodate the battery I attached a large resin rock formation to the base and then went in with a dremel to bore out a depression. This was a very time consumming process particularly because I had to make sure I was doing it in a sealed room, with a good vacuum to catch the shavings and resin dust. In short, I took over my fathers workshop, stuffed a towel under the door jam, hooked up a vacuum that has a hermetic seal on it and put the hose right next to where I was going to be working and then set up a fan behind me to blow the dust into the vacuum hose. Just to be safer I used gloves, a respirator, a mask sealed with petroleum jelly, and head phones. I felt a little like I was wearing a space suit or something.

the base of the HelBrute showing the built up rock face with green stuff.

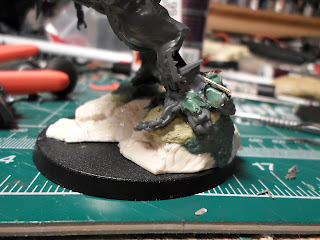
In order to mount the HelBrute on the base I had to build up the rock face with some flater ares for it to stand on. So I used some of the rock facings I've made with extra green stuff over the last few months and attacked them to the resin rock with super glue. Then I went in with plumbers putty and filled in any spaces between  the resin rock and the green stuff rock facings. Once the putty dried I went in with green stuff and put down a layer. I then took several rocks and textured the green stuff with them. Over all I like how it turned out.

showing the switch on the side of the Helbrute
 Here you can see the switch under the arm to turn on the fist.
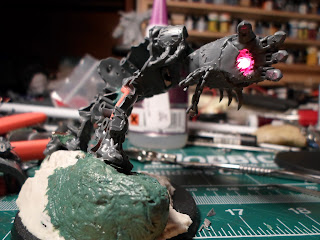
The light in the fist of the Helbrute

And here you can see the light in the fist.


Saturday, May 04, 2013

Team Helbrute update

Well first off the good news. Gotten some interest in the Helbrute thread I posted. Disease on Bolterandchainsword posted an older pic of a Helbrute he was converting to have a power scourge.
It's a nice approach. I'm hoping he'll post newer pics as he explained this was a work in progress.

Next the bad news: I killed my first attempt. See the LEDs I installed run best on 3v of power. The Dime battery I was using provided exactly 3v of power. So no need to install resistors. Well until I went to test the circuit with a 9v battery and promptly blew out all three LEDs. :( So yeah. Bummer.

Now the better news: I don't quit. I ordered a half dozen Helbrute models on Ebay and have managed to get a fair amount of work accomplished on a HelBrute with 2 power fists with red LEDs installed behind the head and in the palms of the fists to represent the flammers.

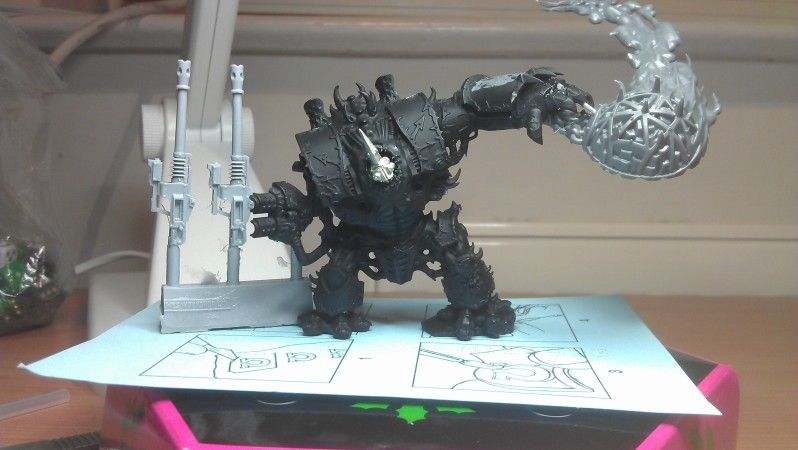
So here you can see the extent of my work on the model thus far. Built and wired the base, though it still needs some green stuff work to fill in gaps. Built the two power fists, and carved up the body. 

I'm going for a sort of "roaring in anger" sort of pose for it, a bit like this:

So I have to reposition the body and arms. The upper torso will be angled back and the power fists will be positioned outward relative to the body.

I'm also installing LEDs into the torso, and in the palms of the fists to get some lighting effects going on with the model.
Here you can see the left power fist with the LED illuminated. I'm also going to install similar LEDs in the torso to provide red illumination around the face.

Now... here's the really annoying part of all this: The fact that I'm incapable of doing a simple easy project. Allow me to explain. Build a Helbrute with a different weapon load. Easy. Pose it in a new way. Okay, bit more of a challange. Install LEDs to light it up. Okay, don't see that too often. Now do all of that on the same model. Okay now we're getting into a challenge. See because the HelBrute is a snap-fit model, a large amount of the detail in it is modeled to accommodate it's pose. Which means in order to change the pose I have to change a lot of details.
The feet are a prime example. I wanted to model the HelBrute with it's toes clutching on the edge of the rockface. So I have to cut off the toes that will be in a different possition, and re-attach them in their possition. But to do that I have to make sure the base will work with the model. Which means building up the base UNDER the model itself. But wait I want to light up the model. So now I have to pass wires out of the base through the model. You see how I'm just compounding the challenge? Yeah. That's where it is.