Some time back I started work on a conversion project where I took the
1/100 Scale Heavy Arms Custom Kai from Endless Waltz, and convert it
into something more like what appeared in the Anime series. I had
finished the project some time ago but hadn't had a chance to finish the
review video of it. Well it is up now!
Monday, November 23, 2015
Wednesday, November 18, 2015
Wednesday, November 11, 2015

So with a finished project, what problems did I encounter working on it? Well the legs are the first thing that stick out. I mounted the feet too far apart on the Libra base, so this forced the legs further apart. This creates a bit of a bow-legged appearance and hurts the final version of the model.

Monday, November 09, 2015
So now we're starting to wrap up this project. Wow has it ever been a trip to get to this point, from experimenting with casting clear resins, to building new sections to replace what would otherwise be moving joints, to modifying existing parts to accept new components. Now it all begins to come together.
 It was a fairly simply matter to cast a new part for the chest gem. I simply attached the original gen sticker to a segment of styrene tubing, and then made the mold based on that part. Unlike casting the saber effect, this was a far simpler affair and required only 2 attempts to get right including embedding the LED in the part.
 Of course putting everything together... that was more of a chore. Here you see the majority of the final connections being made in the chest cavity.
 I should have thought of this before, but alas I did now. The way the model is intended to transform, there is a slot in the back where the hip/waist assembly would fold up allowing the legs to flip over the back. Since I removed the actual transformation mechanism, this space was no longer needed and I really should have covered the slot with styrene and painted it to match the rest of the waist. Sadly this wasn't something I thought of before hand. So if you look closely you will see the wires in the finished model.
 "What? you think I was going to skip arm day?"
I had to use pressure clamps to hold the body together while the glue set. This is largely it. Next time the finished project.


I had to use pressure clamps to hold the body together while the glue set. This is largely it. Next time the finished project.
Friday, November 06, 2015
So today I'm talking about fabrication. One of the major features of the Gundam Epyon is its ability to transform from mobile suit mode:
 to a twin-headed dragon style mobile armor:


 I used a series of styrene tubing I built up a central section that would pass up through the assembly, and then glued a section of 1/4" styrene block into the space behind it. This combination provided a solid base to firmly attach everything together and effectively remove the entire transformation mechanism.

 There were 2 other sections that I chose to make non-moving, the elbow joints. See in the standard model the elbows are made by joining 2 pvc joint pieces so that it will have a 2 axis range of movement. While this is nice, it doesn't help for this project. So I went to work building replacement joints that would be glued into place.
 I started with segments of 1/4" styrene blocks and drilled out holes to accommodate the mounting pegs of the fore arms. I then passed segments of tubing through the upper portion of the blocks that would match the mounting holes in the upper arm. I added some groove slats to the back side of the sections to add some visual detail. With the parts glued in place, some paint finished the fabrication.

This gimmick is carried over to the model itself and is managed by way a
splitting hip/waist assembly. As far a gimmick trick it's a nice setup,
but for my purposes it creates some issues. Specifically the risk of
the hinge joint causing the electrical connections to be broken after
assembly of the model. So I had to address this by either gluing the
hinge shut or reinforcing it. I elected to do both:


Wednesday, November 04, 2015
I knew from the start that the giant beam saber was going to be a critical component of the finished model. I wanted the entire saber effect to glow bright green and that was going to be a challenge. At first I toyed with the idea of inserting a flat LED into the base of the saber effect and running wires through the hilt and into the hip.

While there was ample space to place the LED in the base of the saber effect, there was the issue of connecting it to the power source. I felt a bit nervous about trying to solder the connections so close to the hilt. So I decided to go with resin casting with the intention of being able to embed a string of LEDs into the saber effect.
Yeah... working with translucent resins and dyes is trickier then it first seems.


It is a very solid and very nearly totally opaque red. It looks kind of cool, but it wouldn't work for my purposes. I did try putting a super-bright LED to the red resin just to see how much light did come through. In a totally dark room, with not other light sources what so ever, it just barely glowed at all. Far too dark for what I was going for. So I went back to experimentation working with differing concentrations of dye in the volume of resin. I used rock molds to avoid wearing out the saber effect mold I had made.

I finally settled on an approximate ration of resin to dye by mixing up 1 1/2 ounces of resin and adding about half a drop of dye from the very tip of a pin. Yeah when they decided to call there dye series 'So Strong' they picked the right name. With a good ratio figured out, I went to work building the LED array to embed in the cast. I settled on a series of four flat LEDs to get the proper brightness. It took some finagling, but I managed to get the LEDs roughly in the middle of the mold and the resin properly cast around them.


Monday, November 02, 2015
"Hey Zecks, Zero is saying you have no future. Is Epyon telling you different?"

So today I'm talking about the head. Since this a basically humanoid model, you know if you ignore the large wings, the devilish appearing armor and the whip arm that is, the head is a major focus point for the model. Because of this I wanted to put extra care into it's production and preparation.

The first challenge was making space for the LED in the head. I went with a flat topped LED because it's easier to orient. To help direct the light more I painted the back side with silver pant and then came back with several coats of black paint. I wanted as little light leaking out as possible. In order to accommodate the LED in the head I had to cut away the mounting ports that would normally hold the parts of the head together. The next big trick was building a new neck brace for the head.
Normally the head sits on a ball joint, but with the LED in there the joint would have have to go. So I went to work with some styrene tubing and built a new mounting brace. I took extra care to ensure the negative and positive leads on the LEDs are on the right and left respectively. This way it was going to be easier to connect everything later one.
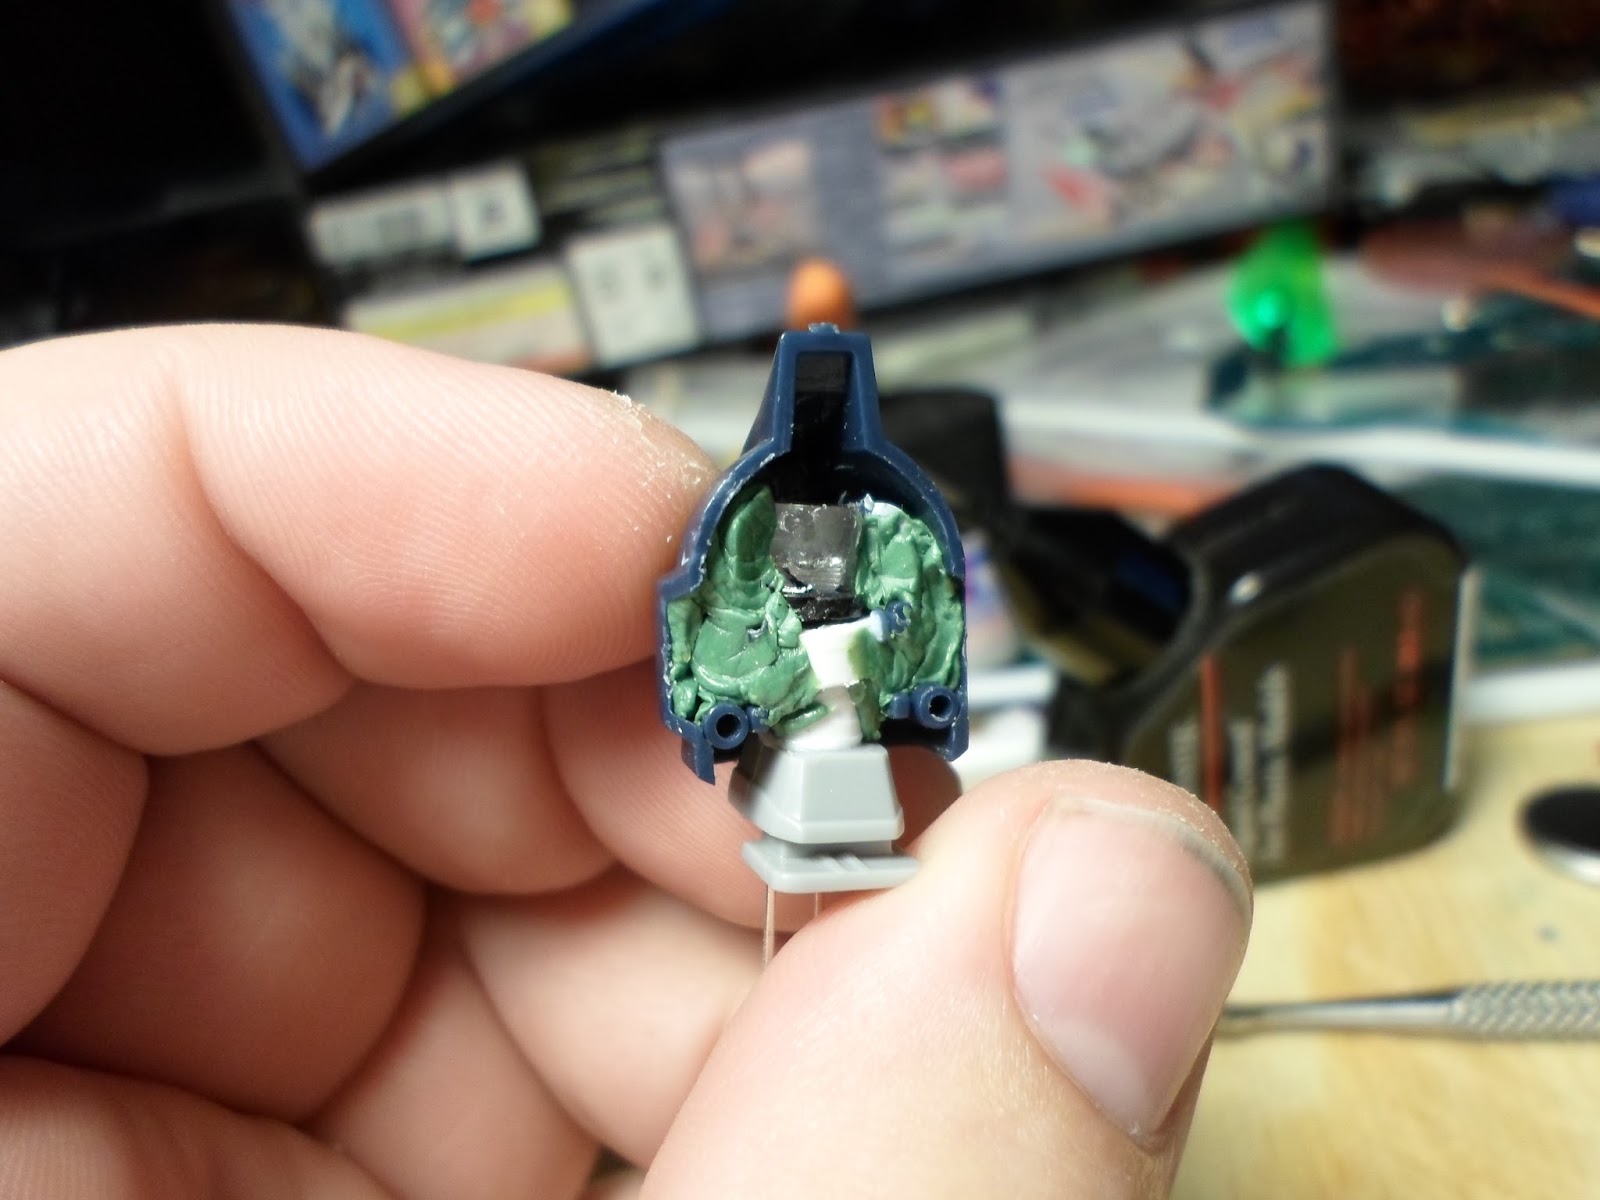
Once the new neck was built, I went back in with some Kneadatite modeling putty and filled in the space. I do not want this LED to move at all.

Subscribe to:
Posts (Atom)


