Showing posts with label LEDs. Show all posts

Tuesday, September 30, 2014

So, trying something...

So on a pure "Hmm that could be cool" kind of moment I picked up a set of 1/100 scale MS Effects. These are clear plastic pieces that are meant to be used to present beam saber and engine blast effects. I didn't have a particular plan for them. I just got them because... hey maybe I'll have an idea for them down the line. 

Well I had an idea for them. Specifically mounting an LED inside of them, and coloring the plastic so that it lights up yellow or red.  Made my first effort today:


Using Tamyia Clear Yellow coloring I tinted the plastic yellow. Then I used a series of drill bits to bore out a space in the plastic for a white LED. While I like the way it turned out, when/if I do this again I think I'd use a yellow LED to match the yellow coloring of the paint.

So I know this was a particularly short post with little real merit to it (though I'm sure some folks were curious about the idea here), but I've got a lot more energy directed to some stuff that's going to be revealed tomorrow. So stay tuned.

Tuesday, January 07, 2014

It came from below

So got the Trygon mostly built.
The based Trygon.
This project had several challenges, starting with the eyes and culminating in the base. If I had planned it out a bit more I could have actually made the head swappable and still kept the light up eyes. But alas I didn't.

The eyes were the first challenge. There isn't enough space to put 2 LEDs in the head, so I needed to use one LED with fiber optics for the eyes. But even that came with a challenge. The distance from the base of the neck to the eye sockets is fairly short, short enough that the Fiber optics doesn't have enough distance to allow the fiber optics to bend. So I had to find a way to make the fibers bend with out snapping. The answer? Heat. I just needed to heat the fibers enough so they would become pliable, then I could bend them to the angle I needed and let them cool. Once I had the LED set in the neck, it was just a matter of carving out the eye sockets and gluing the fiber optics in place.


The next challenge involved installing the wires in the body. This was a challenge because of how the model is designed. The chest, the abdomen, and the thorax are each separate parts that are themselves made out of halves. So I had to make sure to pass the wires through each half with out interfering in the ability of the parts to be assembled.

Then came the real challenge:
The base for the Trygon.
I wanted to make the Trygon look like it was bursting out of the ground which meant that there had be to ground being thrown up. I watched that scene in Starship Troopers, where the bug comes bursting out of the ground, like 50 times to get some ideas. Once I had a rough idea I went about making the design so that it would accommodate the battery, switch, base of the Trygon, and the wires.
Bottom of the base showing the battery and switch.

From there it was largely a matter of building up layers of cork board and then adding additional layers of bits in layers to show the ground being thrust upwards. Once I had the layers of cork down, I added a layer of glue and put down a combination of sand, gravel and modeling dirt.

I added an extra layer of 2mm thick styrene on the bottom and installed magnets in it. This allows me to change the battery and flip the switch.

Thursday, October 17, 2013

projects...

So... been working on some stuff lately. Anyone remember my post about 4 months ago about building a better Storm Talon? Well I'm working on it. Slowly right now. First step I'm undertaking is installing colored fiber optics in the cockpit so that it will be illuminated.

It's a slow process and annoyingly I have to get more resistors for the LED circuits I will install. So I've ordered them. They'll probably be in next week. As it is standing now I've installed a series of 24 colored strands of fiber in various groupings around the cockpit. Now the crappy part... is I have to wait for the resistors. Sigh. Next week it is.

Sunday, July 28, 2013

Still here and still working on lighting up the world

Yeah I know, I haven't posted in a while. Life gets that way. I have managed to get a few games of 40k in over the last couple weeks though. Learned some stuff. Saw where I made some mistakes. Made mental notes to try and not make the same mistake again. Also I got a new job at work. So been busy the last several weeks.

Finally got some time off and got to work on a new project. Still waiting for the bionic bits I ordered to come in so I can start building the cybernetic Space wolf Thousand Sons though.

So my current project:
Yeah, it's the turret to a predator with some wires in it. Basically I'm building a predator with LEDs installed so it will illuminate in various ways. The big part of this is that there will be 2 blue LEDs installed in the Lascannon barrels of the turret. Now You may or may not remember a prior project where I did something similar with a Shadow Sword. One of the major problems I had with that was the side sponsons. By passing the wires up through the turret I can't turn the turret much more then about 45 degrees with out fear of breaking the connections. So this project is keyed to deal with that exact issue. So I built a sort of rotational joint by using 4 segments of copper piping, each pair sized to fit inside one another. 
You can see one pair in the upper segment and the other pair in the lower segment. This way the turret can rotate a full 360 degrees with out fear of breaking anything.

I'm also installing head lights in the Predator as well.


Monday, May 27, 2013

Projects and updates

So I found myself the recipient of what is probably the single best time off arrangement I can: 2 days off, 1 day of work followed by 2 more days off. Why is this such a good arrangement? Simple. I get 2 days to myself, to work on my stuff, and then just as I'm getting a little bored of my own projects.... boom I have a day of work that acts as a re-set on my own personal projects and then I have 2 more days to work on my stuff. So what have I been working on? Well several things.

Yeah I stuck a bunch of wires in a bread board.

Dragon Forge's Heroic Urban Rubble base with wires in it to power an LED
No I've done more then just that.  I'm working on a new captain on bike for my Blood Ravens but I'm feeling ambitious so I'm going to wire it up so the head lamp in the bike will light up. Which means it needs power. So using the Heroic Urban rubble bike base, available from Dragon Forge Studios, I took a dremal to the bottom of it to carve out a space for a button battery.
a Dragon Forg Base with a space drilled out to accomidate a button battery
I messed up the messurements and didn't make the opening deep enough to account for the battery clip and the battery itself. So I added a 2mm thick sheet of styreen to the bottom of the base to account for it. All in all I think it helps because I'll draw more attention to the captain who should look more heroic and stand out. 
Space marine Dark Angel bike ferring with the head lamp drilled out to accomidate a 3mm LED
I drilled out the head plate for the ferring and was going to mount the LED in it but then discovered the white LEDs I have are 5mm and 10m, not the 3mm side I need for the mounting. So I'll have to pick up some 3mm LEDs to continue working on this.
space marine bike body with the holes to accomidate the electronics
Since the bike is going to be attached to the base, and have wires running through it, I specifically went in and glued the wheel halves to the body and then carved out too spaces in the back. one you can see at the front of the rear tire. This is for the wires to come back through the body and connect to the switch in the back of the body. The second space you can just barely see at the top of the rear wheel. That's going to be where the switch will be installed.
Blood Raven Land speeders partially painted and assembled.
 Something else I've been working on: My Blood Raven's land speeder detachment! Here you can see the 3 of them:
Blood Raven Land speeder equipped with an assault canon
 I installed magnets in the noses and in the turret bases of the weapons so they can be swapped in an out.
Blood Raven Land speeder equipped with a heavy flammer
 Allowing me to field them with heavy flamers or assault cannons. I need to build the under slung heavy bolters and magnetize those as well.
pressure pot
Oh and here's some good news: My pressure pot is set up and working! So now I can start working with pressure casting and hopefully begin producing better pieces for my projects. Or I will be once I get the resin and silicons that will work with pressure casting.

Tuesday, May 07, 2013

Helbrute update

Okay, so I'm a dumb ass. I did all that work on the helbrute, building the LED circuit, installing the LEDs in the fists, boring out a comparment in a base for the battery, all the work to build up the base... and I totally neglected the fact that the circuit was going to need about 8 volts of power and the dime battery only supplies 3 volts... So... end result: The 4 LED circuit I had been intending to build has been cut back to a single LED in the left power fist.

I'm also going to modify the post of the model to have the left power fist drawn back and the right one cutting across the chest like the Brute's about to swing back against an attacker with it's burning left.
 
the LED circuit in the HelBrute
But here you can see the finished base and the circuit. I used green stuff to seal off the switch and the junctions in the body. This helps do a couple things.
First it cements the switch in place so that there is no wiggle room.
Second it holds the connects in place so there's no chance of them coming loose later on.

the base of the HelBrute showing the battery
I've spent a lot of time and effort on the base of this model so I'd like to talk about it. Here you can see the dime battery and holder in the base of it. In order to accommodate the battery I attached a large resin rock formation to the base and then went in with a dremel to bore out a depression. This was a very time consumming process particularly because I had to make sure I was doing it in a sealed room, with a good vacuum to catch the shavings and resin dust. In short, I took over my fathers workshop, stuffed a towel under the door jam, hooked up a vacuum that has a hermetic seal on it and put the hose right next to where I was going to be working and then set up a fan behind me to blow the dust into the vacuum hose. Just to be safer I used gloves, a respirator, a mask sealed with petroleum jelly, and head phones. I felt a little like I was wearing a space suit or something.

the base of the HelBrute showing the built up rock face with green stuff.

In order to mount the HelBrute on the base I had to build up the rock face with some flater ares for it to stand on. So I used some of the rock facings I've made with extra green stuff over the last few months and attacked them to the resin rock with super glue. Then I went in with plumbers putty and filled in any spaces between  the resin rock and the green stuff rock facings. Once the putty dried I went in with green stuff and put down a layer. I then took several rocks and textured the green stuff with them. Over all I like how it turned out.

showing the switch on the side of the Helbrute
 Here you can see the switch under the arm to turn on the fist.
The light in the fist of the Helbrute

And here you can see the light in the fist.


Saturday, May 04, 2013

Team Helbrute update

Well first off the good news. Gotten some interest in the Helbrute thread I posted. Disease on Bolterandchainsword posted an older pic of a Helbrute he was converting to have a power scourge.
It's a nice approach. I'm hoping he'll post newer pics as he explained this was a work in progress.

Next the bad news: I killed my first attempt. See the LEDs I installed run best on 3v of power. The Dime battery I was using provided exactly 3v of power. So no need to install resistors. Well until I went to test the circuit with a 9v battery and promptly blew out all three LEDs. :( So yeah. Bummer.

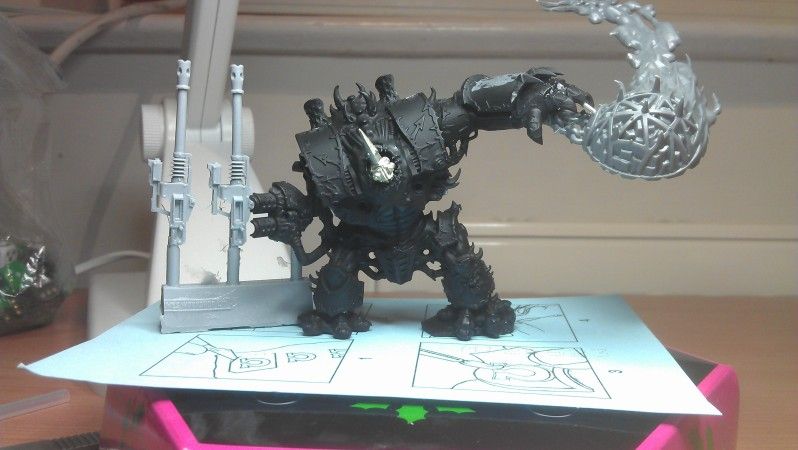
Now the better news: I don't quit. I ordered a half dozen Helbrute models on Ebay and have managed to get a fair amount of work accomplished on a HelBrute with 2 power fists with red LEDs installed behind the head and in the palms of the fists to represent the flammers.

So here you can see the extent of my work on the model thus far. Built and wired the base, though it still needs some green stuff work to fill in gaps. Built the two power fists, and carved up the body. 

I'm going for a sort of "roaring in anger" sort of pose for it, a bit like this:

So I have to reposition the body and arms. The upper torso will be angled back and the power fists will be positioned outward relative to the body.

I'm also installing LEDs into the torso, and in the palms of the fists to get some lighting effects going on with the model.
Here you can see the left power fist with the LED illuminated. I'm also going to install similar LEDs in the torso to provide red illumination around the face.

Now... here's the really annoying part of all this: The fact that I'm incapable of doing a simple easy project. Allow me to explain. Build a Helbrute with a different weapon load. Easy. Pose it in a new way. Okay, bit more of a challange. Install LEDs to light it up. Okay, don't see that too often. Now do all of that on the same model. Okay now we're getting into a challenge. See because the HelBrute is a snap-fit model, a large amount of the detail in it is modeled to accommodate it's pose. Which means in order to change the pose I have to change a lot of details.
The feet are a prime example. I wanted to model the HelBrute with it's toes clutching on the edge of the rockface. So I have to cut off the toes that will be in a different possition, and re-attach them in their possition. But to do that I have to make sure the base will work with the model. Which means building up the base UNDER the model itself. But wait I want to light up the model. So now I have to pass wires out of the base through the model. You see how I'm just compounding the challenge? Yeah. That's where it is.


Friday, October 12, 2012

Gaming Aid: Damaged vehicle markers

I ran across this idea on the blog Ded Ard, and it was something that looked like such a good idea I wanted to give it a shot. Here's the basic idea of it: take one of those battery powered flickering "candles", cut off the plastic 'flame' to expose the LED light, and then glue some poly fill stuffing to the base around the LED. Light spray paint the stuffing with a yellow paint, then spray paint the upper sections of it with black paint to give it a smoke coming out of fire effect. Let the paint dry, turn on the base and viola! Burning wreckage markers that glow!
As an aside I'm considering a variant of this idea for making "Soul Blaze" markers. We'll see how it goes.

Thursday, October 11, 2012

Project Thunderhawk: Shadow Sword ready for operations!

So I finished the Shadow sword. Well finished installing the LEDs anyway. Installing the LEDs was a challenge but not one of ability. The ability to insert the LEDs and affix them to the model required only moderate modifications of normal modeling skills. The challenge was putting the wires in and making sure I didn't cross a circuit somewhere and was still able to assemble the model.

I'm sure you are wondering why I have this tagged with Project Thunderhawk. Well this was intended as a case study in practice for the thunderhawk. For the Thunderhawk I intend to install 3 circuits. 1 will comprise a series of 7 LEDs in the cockpit and embarkation deck which will be on an on/off switch. The second circuit will be installed in the Thunderhawk cannon and be controlled by a monetary switch so when I push the switch it lights up and when I release it, it shuts off. The third circuit I'm still studying up on how to build but that will be the engines.

Now in the shadowsword I installed one circuit that comprises 4 LEDs and are controlled by an On/off switch. This is the Headlights. Sounds a lot like the circuit I plan to install in the Cockpit and embarkation deck of the Thunderhawk, doesn't it?

Then there's the turrets of the Shadow sword. They light up and are controlled by a monetary switch. Just like I'm planning to do with the thunderhawk cannon.


Friday, September 28, 2012

Update on powering the Shadowsword

So I was working on the Shadowsword today. Well the left side of it anyway. I installed a pair of yellow LEDs in the head lamps, a green LED on the Lascannon turret as a targeting array and a red LED in the base of the lascannon barrel. Drilling that barrel out was a royal pain in the posterior.

Now there is a couple hick ups in the work. Firstly, the turret has 2 pairs of wires running through it's axis. What does this mean? Well it means that the turret barrely turns. It kind of turns, like 15 degrees or so. I can force it to turn more, but I risk damaging the connections inside the turret. The second problem is the sides of the lascannon barrel. In the process of drilling it out they were thinned down considerably, and the LED at the base of the barrel glows through the sides of the barrel. I'm hoping a layer of chaos black will cover this up.

Sadly, there was another problem. In the process of adding in these circuits, I accidentally short circuited the red LED in the main cannon and it blew out. So the Shadow Sword cannon will no longer light up. :(