So I'm going to put together a series of videos about scratch building with the first section of the series talking about Paper crafting, or more commonly known as paper hammer in our circles. As a prep for the project I'm doing a bit of an exploratory project to build a paper-hammer baneblade, that way I can make the mistakes, and find the screw ups, make note of them and address them in the finished project. So here's my progress on the exploratory or as I call it "This is what I screwed up!" As a bit of fellow-40k blogger support, and credit where credit is due, I'll be pulling a lot of references from Virtual Stranger's blog "In The Grim Cheapness of the Future...". He completed a paper-craft build of a plague reaper based on the same plans I'm using for the BaneBlade. He chronicled much of his work and much like myself, he believes in showing people his screw ups so others can learn from them. So now I'm the one making the screw ups and you get to learn from my screw ups.

The Lascannons were actually the first parts I built for this project. I had a brain storm about how to go about building them. By rolling strips of cardstock that have been saturated with white glue around the body of a tooth pick and then rolling additional pieces to affect the extra details. Then affixing pieces of cardboard for the under barrel support and muzzle. This allowed me to build up details and get that more unique Lascannon shape and design. Overall, I am pleased with how the lascannons turned out.
 The next part I worked on was the main body with the demolisher cannon. The cannon doesn't move sadly. Perhaps in the next version. This is an example of one of the things that the plans I'm working from leaves out. There are no plans for the demolisher cannon beyond the side mounts. The back of the mounts, the cannon, the barrel base, none of them are in the plans. So I have to design them myself.
 I could see that the major join between the forward hull and the upper hull was going to be a critical point of connection. So in order to reinforce that added extra layers of cardboard to the connecting planes and added braces on the under side of the turret mount.

The mounting for the main turret was a bit of a challenge for a couple reasons. Firstly because there isn't any sort of mount in the plans. You just have the turret, and then you the upper hull. Nothing to really mate the two together. So another part I needed to design and build myself. What I did is I measured out a circle that would fit inside the space for the turret, it turned out to be about 5cm in diameter. Using a little geometry I cut a strip of cardboard that would roll up to be a tube with a diameter of 5cm. I rolled it up to form that tube, then glued a cap on one end of it. To help reinforce the tube I added cross bracing inside the tube. Then I put a lot of white glue into it and allowed that to dry for a couple days.
 A nice trick I found for when you need to make something round you can cut a series of shallow cuts across the width of a piece of cardboard, you can more easily roll it into a tube. In this case each cut is 4mm after the previous.
 I mounted a series of 4 sheets of cardboard in the bottom of the upper hill section all with the 5cm hole cut out to accept the mount for the upper turret. By layering the cardboard like this it greatly increases the strength of the part.


Always such a challenge finding ways to hold parts together while glue dries.
 The finished upper hull and the main turret mount. Turned out really well if you don't mind my being a bit boastful.
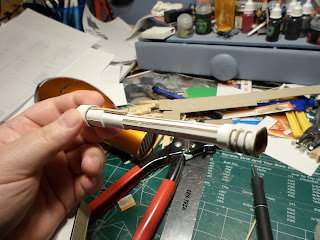 The main cannon. This one I'm rather proud of. See it's built in layers. The first layer is a length of Cardboard 8cm long with 3mm shallow cuts made down the length to allow it to be rolled up. With that innermost portion built I then cam back and rolled lengths of Cardstock around the base of the barrel and the end of the barrel. I them added a second layer of cardstock, but shallower then the first, over top of the layer at the base. Then I added one more layer of cardstock over top of that. I came back and added some barrel bracing with thin strips of cardboard. I then designed the barrel vent piece for the front of the barrel. Was a royal pain to cut out the vents. I have to use only the sharpest and newest blades. I wound up using 4 blades to cut that one piece out.

Here's the main body with the demolisher cannon, twin-linked heavy bolter turret, and main turret. Somehow it looks like some sort of boat to me at this stage.

And then come the tread assemblies. This is a part that isn't 'in' the plans exactly but if you get creative you can get them from the plans. I then had to cut out all that circles. Was rather tedious.
Stranger actually pointed out how to build the treads from the plans for the Baneblade, even though there aren't any plans for parts to build the tread assemblies.

And... somehow I thought it was a good idea to make 64 links like this. Why?

The Lascannons were actually the first parts I built for this project. I had a brain storm about how to go about building them. By rolling strips of cardstock that have been saturated with white glue around the body of a tooth pick and then rolling additional pieces to affect the extra details. Then affixing pieces of cardboard for the under barrel support and muzzle. This allowed me to build up details and get that more unique Lascannon shape and design. Overall, I am pleased with how the lascannons turned out.


The mounting for the main turret was a bit of a challenge for a couple reasons. Firstly because there isn't any sort of mount in the plans. You just have the turret, and then you the upper hull. Nothing to really mate the two together. So another part I needed to design and build myself. What I did is I measured out a circle that would fit inside the space for the turret, it turned out to be about 5cm in diameter. Using a little geometry I cut a strip of cardboard that would roll up to be a tube with a diameter of 5cm. I rolled it up to form that tube, then glued a cap on one end of it. To help reinforce the tube I added cross bracing inside the tube. Then I put a lot of white glue into it and allowed that to dry for a couple days.


Always such a challenge finding ways to hold parts together while glue dries.


Here's the main body with the demolisher cannon, twin-linked heavy bolter turret, and main turret. Somehow it looks like some sort of boat to me at this stage.

And then come the tread assemblies. This is a part that isn't 'in' the plans exactly but if you get creative you can get them from the plans. I then had to cut out all that circles. Was rather tedious.
Stranger actually pointed out how to build the treads from the plans for the Baneblade, even though there aren't any plans for parts to build the tread assemblies.

And... somehow I thought it was a good idea to make 64 links like this. Why?