Monday, April 22, 2013

Go team Helbrute!

So I had a crazy thought a few days ago, about building a bunch of HelBrutes but each converted for the different weapon load outs. There's considerable challenge in this approach, because I wanted to make the conversions from the actual HelBrute model. IE the one out of the Dark Vengeance starter set. Now I will absolutely admit that the HelBrute model is a really great model, as far as snapfit models go. It's got a lot of great details to it, but it's fairly static. There's just not much the model is designed to do. And by 'not much' I mean nothing. The model is designed to be what it is and nothing else.  But then again there in lies the challenge.

So I posted my idea on Bolterandchainsword.com and got a couple responses from folks who were join me on the idea. So I've been working on my HelBrute, armed with twin-power fists with flamers.
The Helbrute with LED installed in the left power fist
 Now myself being who I am it's not like I can JUST build a HelBrute with two power fists and call it a day. No no no. I have to push myself and add something to make it even more challenging. In this case it's electronics. In this case lights. I want to install an led in the palm of each fist and then another LED in the check so that there will be a red glow around the head.
the LED in the left fist
The real challenge so far has been taking the left handed power fist and converting it to a right handed.
converting a left handed powerfirst into a right handed one.


Monday, April 08, 2013

Thank you Virginia!

Okay, it seems like Virginia has FINALLY decided to give us spring time whether and with that has come temperatures that permit priming. Now I know this is going to sound a bit odd in relation to my most recent post where I said I'm largely done with Games Workshop products, but I still have a sizable stockpile of 40k miniatures waiting on my shelves to be painted. Many of them have already been built and I do intend to still play from time to time. So that's what I've been doing today, working on my ready stocks:


In this case I'm working on a drop pod and 3 land speeders. You can see the lower frames of the land speeders mounted on the tooth picks with the central computer console for the drop pod on the corner of the Styrofoam block. I only partially assembled the land speeders and mounted them on tooth pick this way purposefully to make painting them easier. Easier in that I can get at the interior details and then assemble. You can see the legs of the marines have been painted all the way down to the ankles.
I ran into one little hickup with the land speeders though and it is a minor one, though worth noting. See I got 2 single Land Speeders, and the Dark Angles Raven Wing battalion box set to get the third. Well the Land Speeder in the Raven Wing box is the older design of land speeders so I've effectively got two different models. It's not a huge problem, but it has created a few minor planning issues. For instance the newer version of the land speeder allows you to build the lower section of the entire Speeder body and then apply the top of the body to that. if you look at the land speeder body on the right you see how the seat backs are attached to the bottom of the speeder, but on the left the seat backs are attached to the top portion. Like I said, not a huge problem just an annoyance.

So far I've only managed to paint the central console on for the drop pod. Nothing terribly note worthy here. But worth the picture.


Now one other thing I've started working on, a new game. Does anyone know the Mobile suit Gundam franchise? Specifically the segment known as the "Universal Century" time line? Well if not here's the brief break down: Mankind has begun to colonize space with the use of space colonies. But after nearly 80 years one group of colonies have declared Independence and launched a war against the Earth Federation. Initially the Space colony had the advantage with the advent of mechanized war machines known as mobile suits but ultimately the Earth Federation caught up and developed their own Mobile suits. That war last about a year and the following series explored the fall out from that war.

Well I'm a big Gundam fan and I was watching the series 08th MS team the other day and it got my mind rolling about the idea of a table top strategy game based on that. Meaning you get a team of between 3 and 7 pilots, outfit them with your selected mobile suit, and then equip the suit with the various weapons and then you and your opponent each attempt to achieve your respective objectives. I figure you can use the 1/144 scale models to represent your mobile suit teams. it'd be a notable investment to get a basic team up and running, but $100 for a medium sized team seems almost non-existent when compared to hundreds of dollars you'd spend getting a 1500 point Space Marine army together.

I don't want to make it a Gundam version of 40k, I intend to make it a bit more complicated than that, but not up to the level of an RPG. Right now it's all in the conceptual stages and the only thing I've managed to accomplish so far is compiling a list of weapons from the first couple series with some rough notes about concepts and ideas that would apply to those weapons.


Friday, April 05, 2013

Things are changing.

Okay, so GW has made a radical change to it's trade partner policies. I won't go into details about what the changes are. There are any number of discussions out there about them. I'm not going to get into discussions about the pros and cones about them. If you haven't heard about them, I suggest you check the MiniWarGamming response video to them.

What does this mean for me? Well it means GW products are basically not my first go-to option for modeling any longer. I'm sorry but the closest options for brick and mortar stores for me are 40 minutes north (2 hours if traffic is even moderately bad) and an hour and ten minutes south of me. I'm sorry. If GW is going to cut out 2/3 of their product line from the non-Gw stores and thus limit me to only online purchasing of them, then I'm going to move on.

So in the coming weeks I'll be looking into other games systems and see what I like. If anyone has any suggestions feel free to post some suggestions in the comments section. I will be upfront and tell you all that I'm not very inclined toward the gaming part of the hobby and am much more inclined toward modeling so the actual models that the company in question produces will be of much greater interest to me then the quality of the rules or gaming systems.

Saturday, March 30, 2013

It's interesting how productive nothing can be

So I'm still here and alive. I know it's been a few days. As I'm so fond of saying "Life happens" Though I do have to say, I had this past Thursday off and I managed to do something I have not done in probably five years: nothing. I mean nothing productive. The most productive thing I did all day was get out of bed and shower. I didn't have work, I didn't do any work on my school projects, I didn't have any calls with clients, I didn't work on any models, I didn't work on my movie listings, absolutely nothing. all I did was sit on my butt and play video games. Here's my life lesson of the day folks: Every once in a while, you just have to do nothing. Just like every 3 or 4 months just take a day off from everything. Arrange time off from work, get it on a day you don't have class, in a period where you're not prepping for something, and just do nothing.

But that doesn't mean I haven't been working on stuff the last couple weeks. I'm taking a little break from the Thunderbolt due to finances. I'm not broke but I need to reconsider my spending a little bit. When I went full time at work I immediately applied for benefits. So now I have a 401k, Tuition reimbursement, Health Insurance, Dental Insurance, Vision coverage, a Stock portfolio, and a bunch of other nice little tidbits that come with working 35+ hours a week. So yeah me! Buuuut.... I have to pay for some of those benefits. It's not like crippling huge, but you notice that $90 being take out of your check. Plus I'd like to take a trip out to Arizona and actually meet some folks face to face that I've been talking with online for what seems like ages and eons now.

So have I been sitting idle? Yeah right. I said I took one day off and did nothing. But I'm the living embodiment of  ADHD, I can't sit still and not work on something. So what have I been working on? Well a couple things actually.

First thing, a Nurgle demon prince/Greater daemon. It's the Forge World Mamom model I got from a lot auction on Ebay. I bid $100 on the lot of "40k stuff" and got a Hell Blade fighter, a hand full of Chaos Renegade torsos, the Mamon daemon prince, several auto-cannons, a hand full of lascannons, some Space marine torsos and legs, the top section of a Rhino, and a bunch of other stuff. The Hell Blade was complete and I built it... and I gotta say I dislike the model even more now. I'll go into more detail about it later.

But I also built the Mamon figure. With the exception of one tube the model was complete but it was partially deformed in some spots and left gaps that I just wasn't comfortable with leaving unattended to. So I went at it with the sculpting putties. I used 2 types of putty on the model based on where I was using it. Around the elbow of the club fist, and the neck line I used milliput because those were largely flat areas where if the putty failed to hold it would simply appear to be skin flapping off the muscles. Around the shoulder, and where the tube connects to the arm I used Kneadite (Green stuff) to fill in the gaps. I also rolled out a tube of kneadite to replace the missing tube on the back of the arm. I'm going to go back with some more kneadite and add decay and rot to the tube.

Beyond the Daemon prince I'm still working on some scratch building in the form of a drop pod. As I explained previously, the template I have I think makes a drop pod that is just too small to serve as a transport drop pod, but I do think it's the right size for a death storm drop pod. So that's what I'm gonna try and build this pod as:
 
Here you can see the first wing master I produced in sheet styrene. I'm working on the other four now:
Here you can see the four segments of 2mm thick styrene attached with super glue and held in place with a clamps. This allowed me to take a file to the edges of the parts to make them all match. It's a slow process, cutting through 2mm of styrene is a slow process. And then sanding all the parts down... yeah a bit monotonous.

Sunday, March 17, 2013

My hand wants to murder me now...

So with the whether kind of sort of maybe in a weird reverse sort of way starting to head in the springy direction, I've started getting ready for the days when the temperature will be warm enough and the humidity low enough to make priming my models doable. Toward that end I've partially assembled 3 attack bikes, 3 land speeders, and a drop pod and mounted the parts on tooth picks mounted in sections of wood I'm going to use as painting sticks.
 

And you see the... that's a lot of parts and pieces.  There are three 2' sections of wood filled with holes that are mounting the parts of the landspeeders, attack bikes and drop pod. I've also got a unit of Assault marines that I'm in the process of preparing to be painted that will like wise be added to the priming party. And a 5 man unit of Terminators. And to think, I drilled all 76 of those holes with my pin vice.

Friday, March 01, 2013

Have I got my work cut out for me

So, I've had a rather bizarre series of luck the last couple weeks where I won a bunch of Ebay Bucks and used them to buy a couple kits and then I won a raffle that netted me another kit and then I got a discount at the hobby store that netted me basically a free land speeder, honestly I've lost track of it. But I took all the kits I have sitting in my cabinet waiting to be worked on and stacked them up and was rather shocked at my haul of waiting to be built kits:
Let me count out what this is getting my Blood Ravens forces:
3 Land Speeders
1 Attack Bike
6 Biker Marines
1 Land Speeder Storm
2 Drop Pods
5 Assault marines.

With the whether beginning to change toward the warmer temperatures I'll be somewhat short on time to get all of these kits built and ready for priming before the "Too-Hot" to prime weather hits. I still have those three attack bikes I built a few weeks ago ready for priming too.

Wednesday, February 20, 2013

Trying something a little different

So I'm still more or less running on neutral for the Thunderbolt project, which also means the Thunderhawk project is on hold for the moment. In truth alot of my hobby stuff is kind of on hold or at least on slow-mo for the immediate time being. Money has become a bit more of a consern then I had anticipated so I need to curtail my hobby purchases for the immediate time. But, that doesn't mean I'm not doing stuff. It just means I'm doing different stuff. Here is one such example:
Yep a paper hammer drop pod! There isn't a particular reason I built this model, well not one beyond the fact that I had the template and didn't have anything better to do with my time that I was interested in. So a couple microwavable pizza boxes, about an hour in photoshop to color the template, 20 minutes to print out the 3 pages and like 3 hours to build it.
Over all I like the final product, there's just one little problem:
It is too small to carry a full 10 man squad of marines. You can see here how it would only 4 marines. Not a particularly huge deal I suppose, but it is a point of annoyance for me. I think I'll build 3 more and modify them to be Deathwinds though.

I purposely glued the door panels open mainly to be fair to my opponents but also because I just really can't stand seeing a closed drop pod sitting on the table. It's kind of like with the Storm Raven model if you add the hurricane bolters. How the *bleep* do the marines get out of the thing? I know I know, it's representational not functional. But you know? It's my model! If those points bug me, that's my problem! :P

Thursday, February 14, 2013

Duke Nukem?

You ever have a moment when you're working on a project, you look up for a second and something catches your eye? So you stop what you're doing and concentrate to figure out what that something is? And then you figure it out and you are like "Where the frack did that come from?"

That happened to be earlier today. When I noticed that I had a 40k version of Duke Nukem sitting on my work bench looking back at me:


Monday, February 11, 2013

More speed!

So I've been working on a new attack bike squad for my Blood Ravens. From what I've been looking at rules wise, I think Biker armies are gonna be the default go-to army for 6th edition. Hammer of Wraith, T5 all the time, a 12" move with an extra D6 charge range, relentless. I mean let's face it bikers got a lot going for 'em now.

So here is my new and freshly converted  attack bike squad:

So I'm sure you're sitting there saying "Wait a second, you said they were converted. And that they were attack bikes. Yeah the one dude's got the scanner array backpack, but what's actually converted? And why aren't they attack bikes?"

Well, I guess I used the wrong word. I think I would have been better off saying they are transformable as opposed to converted. Allow me to show you what I mean. Here is the same bike squad with different bitz:

You can see the two forward most bikers are now armed with a melta gun and plasma gun.  Here is another change:
I magnatized them so I can swap the configurations between Biker and attack bike. With the addition of magnets in the right shoulder, the models are able to swap arms so they can be armed with different weapons. By putting magnets in select locations in the under carraige of the bike and matching points on the side car I can attach and detach the side car as needed.


Sunday, February 03, 2013

We are the Blood Ravens!

A good while back I was playing Dawn of War II and I had become inspired to begin work on a Blood Ravens army. Well they had sat on the back burner for far too long and with my funds effectively stopped, following my recent medical bills, they came out of the case and got some paint on some of them. Here are two of the bikers that I got painted the other day.

First up we have the Captain on a bike:
Blood Ravens Captain on a bike with a relic blade

Model wise he's a fairly straight forward conversion. Grey Knight helmet and great sword in right hand. The sword hand was attached to a converted rifle holding arm that I cut below the shoulder and repositioned it to be held outward. A couple other little bits add to the seniority of the model like the Raven Guard faring on the front of the model. The base is one point I would like to reference though. It comes from Dragon Forge Studios and I highly HIGHLY recommend their bases. I swear by them.

Next we have the sergent for the squad:
Blood Ravens biker Sergent with Power sword
I installed a magnet in the sergeants' left shoulder to allow him to use different weapons. This is going to be compatible with my other magnetized models in the army, allowing them to swap weapons as I see fit.
Blood Ravens Biker sergent equipped with a bionic arm and chainsword.
Equipped with a bionic arm and chainsword.
Blood Ravens Biker Sergent equipped with a chainsword
Equipped with a chainsword  
Blood Ravens Biker Sergent armed with one power fist
Armed with one power fist
Blood Raven biker sergent armed with a power fist
armed with an alternate power fist


Monday, January 28, 2013

Still here

Hey all, I had hopped to post some pictures of my blood ravens today but alas that is not going to happen. I took my computers off line last week and took them in to the tech to have them checked out, tuned up, and cleaned out. Well turns out I've got a virus that royally messed some stuff up. So it's proving to be more of an effort to clean it out. Thankfully I'm a paranoid git who has everything backed up three ways from Sunday so if it comes to needing to simply reformat the system and reload everything it will only be inconvenient. Not problematic.

So I'm sure someone is reading this and going "Wait, if he doesn't have his computer how did he post this?" Simple. I pulled out my ages old laptop. The one running Windows NT 4.0. Yup I'm using a 15 year old laptop to post this. Needless to say this is somewhat painful, the lack of Java, the inability to upgrade to IE 9 (it is presently running IE 4 ouch...), the 12" screen and just general age of the system compared to what I normally use is painful.

In other more pertinent news, I have acquired a new digital camera and I've been working on my Blood Raven space marines. I've taken a great many pictures... and I have no means to upload them to my blog right now. *Sigh* Well stay tuned. I'll post pics as soon as I am able to do so.

Monday, January 21, 2013

Well some busy work

So There's not much I can do with the Thunderbolt right now. Not until I get the new supply of Mold Compound which isn't going to happen for a little bit. Need to recover from the medical expenses. But one thing I don't do very well is nothing. I can't not be working on a project of some form. It just doesn't happen for me. It may not always be War hammer related but I am working on something.

So today I decided to take a cue from a friend and fellow blogger, Virtual Stranger. He runs "In the Grim Cheapness of the Future" and has served as something of an inspiration for my own scratch building adventures a couple of times. So what direction did I take form him? The cheap ass one! I decided to see what I could with what I have on hand. Now with a bitz box the size of the one I have I could probably pull together enough parts to build something on the scale of a land raider if I really wanted to, but I have enough models for the time being. I don't need to build more random ones. So I decided to shift gears a bit and try something in the terrain category. I got a series of videos from MiniWargaming.com a while back. I don't recommend their videos as basis for learning new techniques, as they are rather caviler with their explanations and directions about what they are doing and there have been a lot of times they've just blown through a major chuck of the project and I'm left scratching my head trying to understand what the hell they just did. Like wise they're words regarding safety is painfully lacky and frequently limited to "Just be careful you don't cut your self."  There are a lot of times in the videos where I feel the need to reach into the video and hold up a sign that reads "Do NOT do this the way I am doing it. It is not safe.!" Their videos are definitely geared more toward the veteran hobbyist then the young blood. But they do have some ideas that are worth wild. One video they did is constructing an industrial catwalk using 1/2 pvc plumbing pieces as the basis for it.

The project is rather straight forward and uses a handful of materials. Most of which I had one hand. I made 3 alterations to their project in my rendition of it.

Firstly, I filled the PVC tubes with resin and then attached the catwalks to the piped by counter sinking a screw into the resin in the pips and then pouring resin into the squares under the catwalk platform. This helped secure the entire structure.

Second, I attached long segments of angel bracket to the sides of the catwalk, covering the edges of the diamond plate and giving it a more "This is intended to be walked on by normal people" look to it.
The angel bracked on the edges of the walk way.


The third thing I changed was a partially a matter of convenience partially one of preference. I used an enclosed ladder cage on the lower segment of the walk for the ladder. I grew up around military bases and one thing I always saw a lot of were "Off limit" warnings and safety mechanisms. In the real world these cages are put on ladders to prevent people from falling back and off of the ladder. Yes it's still possible to fall down and have the cage make no difference what so ever. But then you get into the realm of "How did you live long to get hired for this job?"

 I thought this would add a little bit of realism to the piece. Plus I had the material on hand and didn't have to get it.
The nearly finished catwalk
With the exception of the Light diffuser, base board, and plumbing parts, all of which can be obtained from a hard ware store for about $25, all the materials in this project can be obtained through Plastruct and EverGreen plastics.

Sunday, January 20, 2013

The work continues

So my progress on the Thunderbolt continues, but is somewhat halted. I need to order more molding compound. I didn't like how the first mold of the engine came out so I tried to make a better mold. While I managed to do that, I used more mold compound then I had previously planned on. So I need to order more. Otherwise I can't make the mold for the left wing and lets face it, a one-winged Thunderbolt is going to fly a whole lot worse then a two-winged version. However, I'm doubly delayed on that front because I just had to drop about $700 on a bit of a health problem. End result is nothing serious but I'm lucky I caught it when I did otherwise the doctors were concerned I'd be risking blindness in my right eye. No telling how much being blind in one eye would have slowed down my hobbying. So it will be a couple weeks till I can order more mold compound.

But that doesn't stop me from working with what I already have on hand. As previously stated I intend to use magnets in my final build to allow me to drop bombs, remove hell fire missiles and swap out fuel pods as I see fit. Well I managed to cast up one wing with magnets in it. Here's a video showing the magnets in action:
Right now it's using a single bar magnet in each pylon. The bar is magnetixed through the long axis. meaning if you look at the bar like this:

Magnet bar ===>  =============
Then the poles of the magnet are on the ends of the bar, like so:
Magnet bar ===>  =============

While this works it feels a bit flimsy and I think will put too strain on my efforts to build an alignment system into the missiles and pods. Also any alignment system I do build will be based on absolute placement of the magnets in both pieces, meaning if the magnet in the pylon is placed exactly 5.4mm from the back side of the pylon then accompanying magnet in the pylon, missile and fuel pod must also be exactly5.4mm from the back edge of the alignment system. An exacting measurement that is extremely difficult to accomplish. So what am I going to do about this? Well I think I'm going to get bar magnets that are magnetized along the long side rather then on the ends. That way it will be largely self aligning.

Saturday, January 12, 2013

So, what does 2 quarts of Resin get you?

Well, I finished the molds for various parts. Some of them worked out alright. None of them were a complete success. As you can probably guess, I've been casting up copies of the master parts I've been building the last few weeks. Some of the molds turned out pretty good, some of them not so great. In either case it's been a learning experience and now I'd like to share some of that experience with all of you. What I am saying? Learn from my mistakes. Heed my advice. See where I messed up so you don't make the same mistake if you try this sort of work.

So, first up are the molds I've made.
the various molds I've made in the last couple months.
That is a series of 6 molds I've created over the last few months, using various approaches, materials and ideas. Here's the differences between each:

the first 2 part mold I made for quick casting Hellfire missiles.
 This is actually the first 2 part mold I made. As you can see I made it so I could cast up 4 hellfire missiles at a time and one Ork twin linked big shoota. I was intending to use the shoota as the basis for my Chaos Thunderhawk Hunter guns, but alas my first attempt at a two part mold was somewhat flawed and the clay I used in the process turned into a sticky gum when I used the mold release agent on it. This mold was made using Smooth-On's Oomoo-30 Silicone Rubber kit.

the second 2 part mold I made using Smooth-On's PMC-121 urethane rubber
This is the second attempt I made for a hell fire cast. This rubber is Smooth On's PMC-121. This rubber has the advantage of being much denser and thus stronger and more rigid and thus better at grabbing details. The down side? 16-20 hour demold time. That means once you pour the rubber, it's a day until you can pull the mold up. Making a 2 part mold? Don't expect to be able to use it with 48 hours of starting to make the mold.

these molds are for various pieces for the Thunderbolt and are made using Smooth On's Oomoo 25 and 30 silicone rubbers.

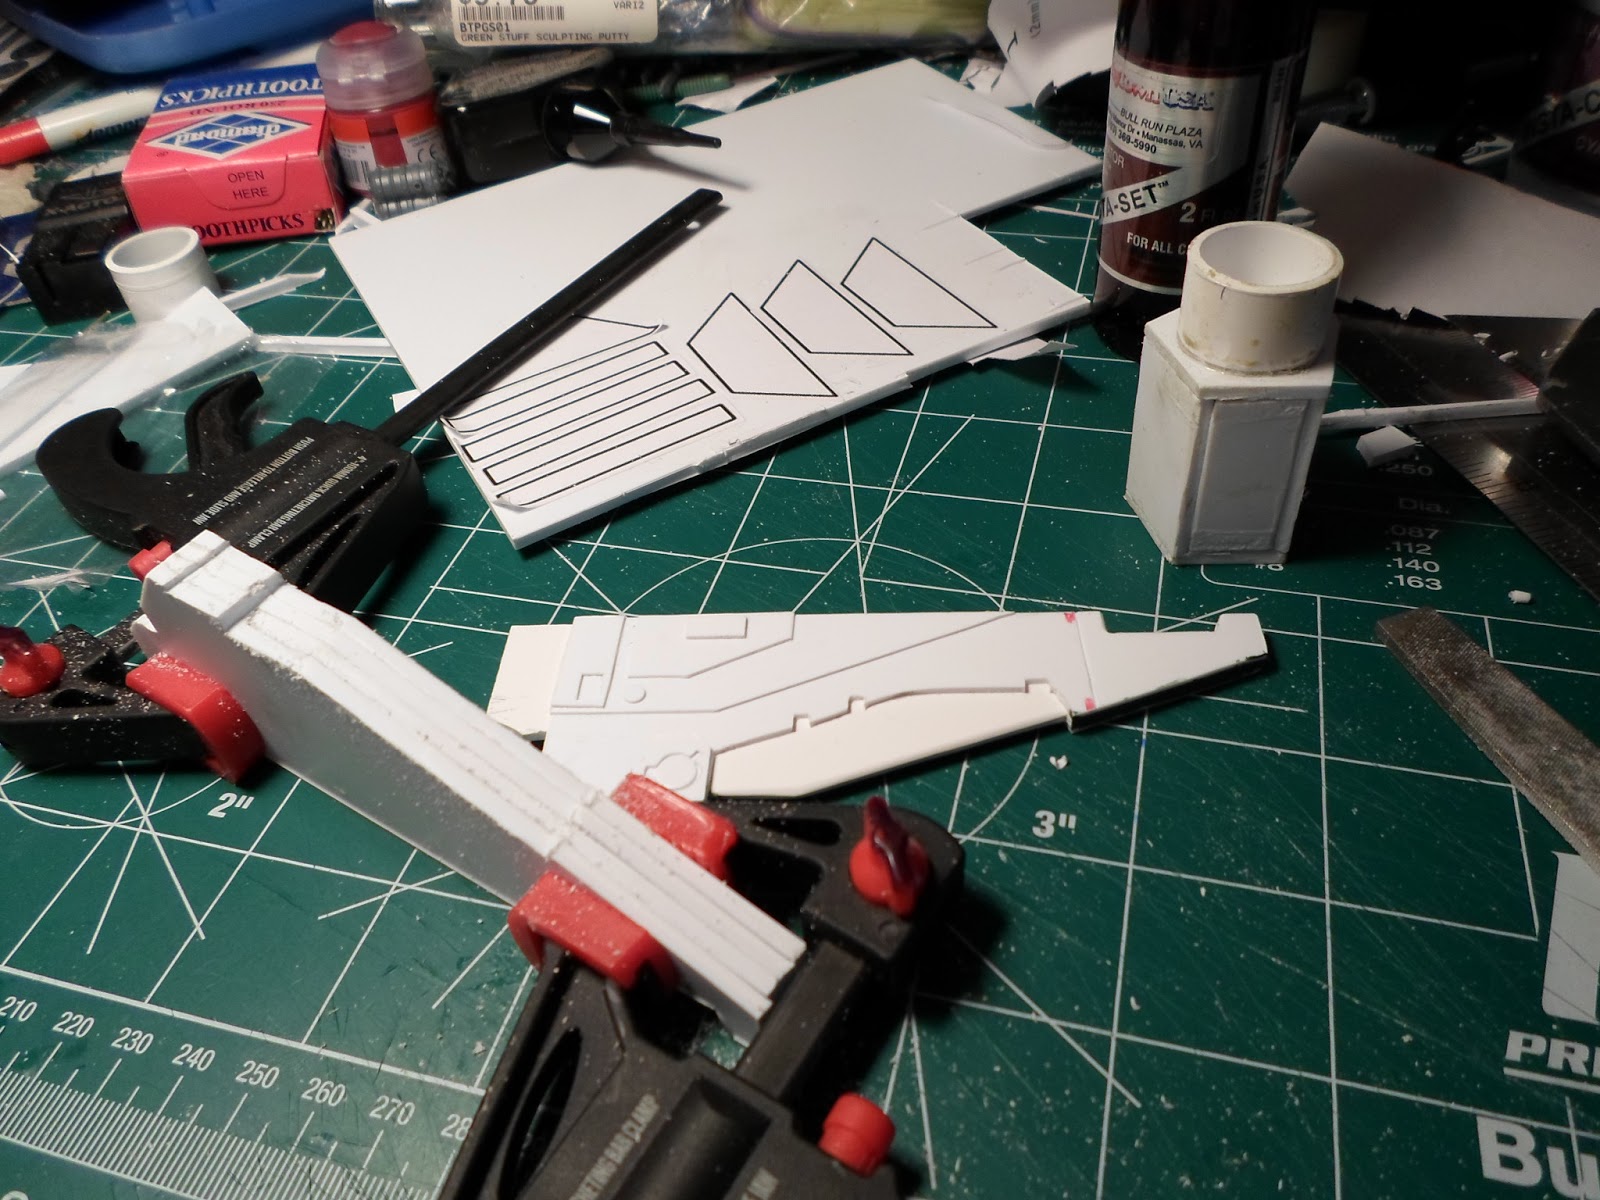
These molds are of the various parts for the thunderbolt. The molds at the top are the engine mounts and the intakes for the engine. To save time I made 2 molds of each so I could cast up the pair of each part I needed in one go. 
The right wing mold
The wing mold... oi vey as this thing ever been a pain in the butt. See here's the thing. In the final wing I want to have magnets in the bottom of the wing Pylon so I can attach hell fire missiles or fuel pods to the model. So I want to be able to put the magnets IN the wing pylons when I cast the wing. Well there's no way I can cast the pylons, and the wing at the same time. So I have to spray down the mold with release agent first, then cast the pylons and let those set till at least stiff and not runny. Then I have to close us the mold, and cast the rest of the wing. And what happens if any part of the process has a problem or isn't done correctly?

This!
a bad cast of the wing

So what do I do? I have to be VERY patient and do each step correctly each time. Roughly it will take me about an hour and half to cast the wing properly.
Like this one:
a good cast of the right wing

The rest of the casting results depend largely on my patience when I cast the part in the question. The exception to this are the engine intakes and the engine mounts.
the intakes came out well enough.

 The intakes turn out fairly well with little effort. Just a little clean up to even out the backs and they'll be good to use.
the engine mounting blocks

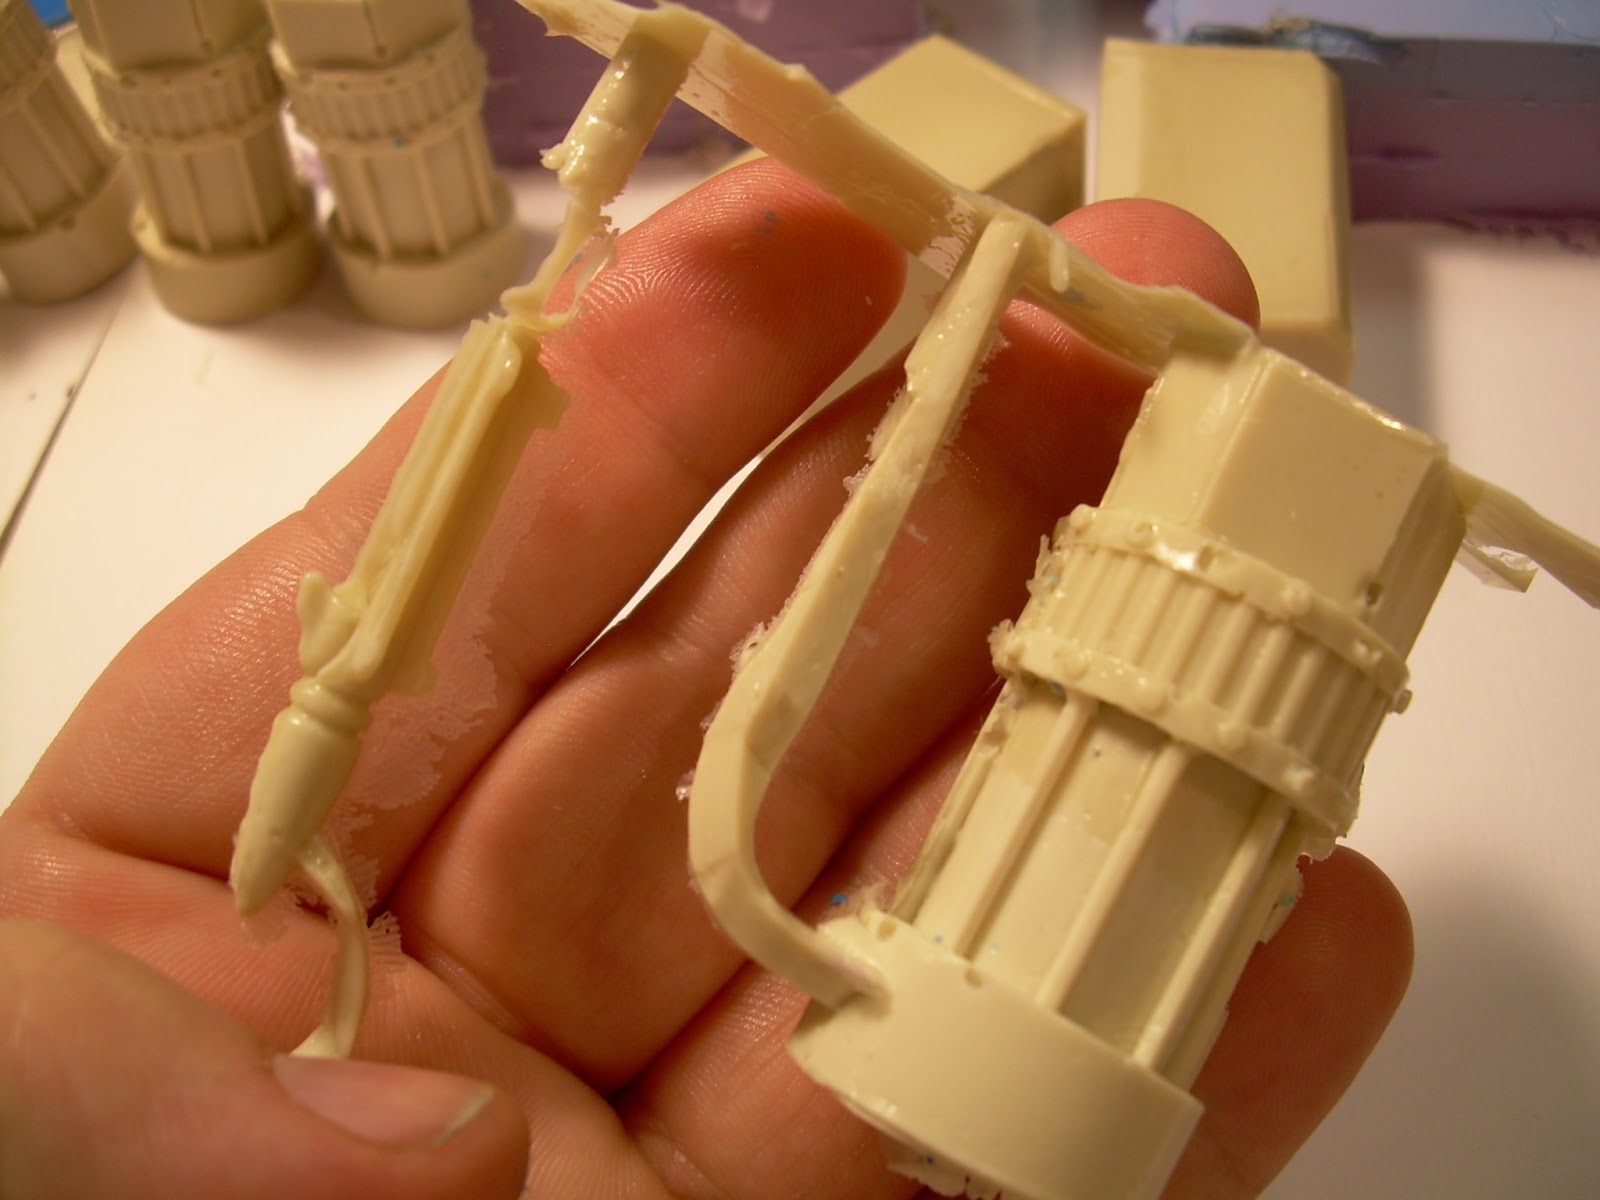
The engine mounts likewise turn out well easily enough. To reduce the weight, and the amount of resin I need for each I submerged sealed styrene tubes in to the resin as it's setting. You can see one of the tubes in the above picture. This effectively makes the part hollow with needing to make it a multi-part construct. Again, just need a little clean up to make the piece workable.

The Engine itself as been a trying expirament:


Oh yeah, the engine has proven to be the most difficult large piece to cast. Because of the small details on it, the resin tends to "bubble" over the details and then dry, leaving a void in the finished piece. You can this in the first couple attempts. So how have I solved this? Simple. Patiance. Namely instead of trying to cast the entire engine in one single go I try to cast in three steps using less resin and poring the resin very slowly at each step.


In this lastest effort I did it in three passes, pouring about 1/2 ounce of resin each time, pouring it along the shaft of a stir stick and trying to keep it the pour rate to a very shallow thin stream in order to give the resin time to spread out and fill in the details on the inside of the mold. Still need some clean up on the finished piece but a substantial improvement over the earlier attempts.

The small tiny details on the weapons have been an absolute nightmare to overcome and honestly I haven't quit gotten them beat yet. Much like the small detail on the engine, the resin as a tendency to bubble up and fill the mold of the smaller pieces creating these large gaping voids ruining the part.
the bubbling problem ruined this attempted casting of a lascannon barrel.
This is the most notable example of this particular problem. Where is the rest of the Lascannon? And why is the body of the hellstrike Missile hollow? Yep, that bubbling problem at work again.


This casting was notably better but still has a hallow body to the lascannon. I MIGHT be able to use this one. Have to look into it more closely.

the best casting yet
This is actually the best casting of those parts yet. YES it has a metric crap ton of clean up on it but guess what? All the of parts and pieces are there! So that's a win.

Now, here's a piece of advice for you if you get into casting: Spend the $10 bucks and get one of these:
a scenic woodlands rock mold
Why? So that if you have an extra 1/2 ounce of resin you don't waste it. Spray this rock mold with some mold release and pour the extra resin into the mold. Just save the extra rocks in a box. You can use the rocks for basing or other terrain projects. You'll look into the box at some point and go "Holy crap! That would look great for my [insert model name here] as a base!" or something of that nature. And you'll wind up with plenty of them in a hurry too.
don't waste extra resin. Put it to use. Cast some rocks.
Same thing works if you're using green stuff and have some extra. Press the extra into the rock mold. Viola! You've got a rock you can use for basing or detailing.

Thursday, January 10, 2013

288 lego bricks.... 3 quarts of silocone rubber... 2 pounds of synthetic silicone clay... a couple ounces of silicone ethal spray... 3 ceramic tiles...

 288 lego bricks....  3 quarts of silocone rubber... 2 pounds of synthetic silicone clay...  a couple ounces of silicone ethal spray (mold release)... 3 ceramic tiles...
So, what does all of that add up? Well right now it adds up to 3 Lego boxes filled with silicone on top of the dryer. My orders came in and now i can continue work on the Thunderbolt, the body of which you can see on the flight stand on the left side of the image.

The first box (on the left) is the first half of a 2 part mold which will have the back section of the engine, the Ammo Hopper I built a while back, a lascannon, and the Autocannon with the angled mount for the thunderbolt. The second box is a single piece mold and contains the intake for the engine and the engine mount itself. The third box in the first half of the mold for the right wing.

Something I'm going to try to do is adding magnets to the design of this model. Particularly for the missiles. So what I'm going to do is cast the wings up with magnets at the base of the weapon pylons, and then cast up the hellstrike missiles with magnets in the bodies of those. So that way the missiles can be attached to the pylons, and removed once they are fired in a game.

Sunday, January 06, 2013

thought I'd provide some information

As I've previously stated my work on the thunderbolt is more or less on hold until I get more materials. I can still work on small details and I am, but I can't make any major head way on the body until I get the materials to cast the molds of the engine mounts. So I've already ordered them so now it's just a waiting game. In the mean time I thought I'd post some information about the materials I'm using for this project.

The first thing is obviously the Styrene, or plastic, materials I'm using. For the large part, the majority of my styrene is coming from Plastruct. They've been around for a while and offer a truely staggering array of extruded styrene shapes and forms. I've also purchased Styrene from another company called EveryGreen Scale models. Their selection isn't as huge as Plastructs', but they have some stuff that Plastruct doesn't.

Take a look at the engine master I built. As I previously mentioned, it's a series of tubes set into one another with other detail added to that.
the scratch built master of the back section of the engine

Here is a structural break down of what I used to build the engine master:
the exploded view diagrame of the back section of the engine
Because I will be referring to different sizes, I have color coded this passage to match with the diagram. The green tube is a length of Plastruct's TB-24 piping, which is measured at 19mm outside diameter. The pink is TB-28 tubing and measures at 22mm. The blue, which slips around the forward most length of TB-28, is a segment of TB-32 and is the largest piece of Plastructs inventory of piping I've needed to order yet. It measures in at 25mm outer diameter. The sea foam green 'C' is a wrap of textured plastic from EverGreen's assortment. The precise one I used in this case is listed as E-5 '4529' "Metal Siding" and is sold in sheets of 100 square inches. Apply a little bit of heat and it becomes pliable and can simply be glued into the length of TB-28.

The floating yellow squares are just panels of .5mm thick styrene I cut and glued to the last section of exposed TB-24. The teal length between the segments of TB-28 are simply lengths of 1mm thick Hex-rod. Plastruct's got these listed as MRX-60. I also got .1mm lengths of these hex rods to become the bolts on the sides of the engine you see in the finished product.

And that's the breakdown of how I built the master for the back half of the engine.

The forward intake was a similar process but needed some innovation to accomplish.
exploded view of the intake section of the enginethe scratch built intake for the engine

Like with the back section of the engine the intake housing is built out of 2 lengths of pipe set into one another. The inner section, shown in pink is a length of TB-28 while the blue is a length of TB-32. The red is a disc of 1mm thick sheet styrene. For the intake blades I had to get creative. I make 4 discs of .1mm thick styrene, the same diameter as the inside of the TB-28. I then cut those dics into 8 segments, like a pizza. Then I glued down each blade seperatly so that each successive blade was over half of the previous one. I had to get a little fiddly with the last two or three in order to get them to line up properly but it worked out. Then I took a hold punch that measured just under 5mm in diameter and punched out the center of the assembled fan blades.
I then took a length of Plastruct's MR-190 5mm rod and sanded one end down to a rounded nub and then put that through the hole I made in the fan blades. To help simplify it all out I attached a scrap piece of styrene to back of the .1mm disc.

And there you have how I build the engine masters for the thunderbolt fighter.